The intro is below. It is a little long, and if you want to just skip it and get to the tutorial about making handy scripts for your scenes, look for the 5 number signs.
This is a tutorial about using OSL intended to aid in getting started with OSL. I have written this as an attempt to help those who do not know C/C++ start learning some basic syntax and be able to make practical use of these lessons, and to help those who already know C/C++ to get started by showing some practical tasks that do not require an understanding of what a closure is. If you already know C/C++, you can graze over much of this, or use it as a review. This is my first blender tutorial, and I have done what I can with the time I have available while still publishing it. I tried to put some emphasis on troubleshooting, but that it’s self should probably be a tutorial all by its self. I simply did what I could without derailing the entire tutorial.
Ok, so OSL is a wonderful tool for making shaders, but simply using it to put together and output a material isn’t the only thing you can do with it. Putting together materials in OSL is also not necessarily the greatest way to learn how to work with it. There are many other uses for it in your material, especially if your material is something more complex than something like simple stone. Things like lights and screens, that might require some sort of control system, making less common materials or giving materials the abilities to do things useful for animation or rendering. Making unusual materials, for instance, might require entering some formula, which is really not very efficient with nodes while the expressions syntax for OSL is very similar to many other mathematical syntaxes, allowing equations to be tested and verified. Lights and screens might have a set brightness, changes in appearance based on the direction they’re viewed from, or unique texture to them. This complexity in a material may be faster or easier to develop with text. Complex repetitive actions, such controlling a stoplight, might be made simpler by driving a script with the frame rate and number, and controlling actions of other elements based on the calculated time from those values.
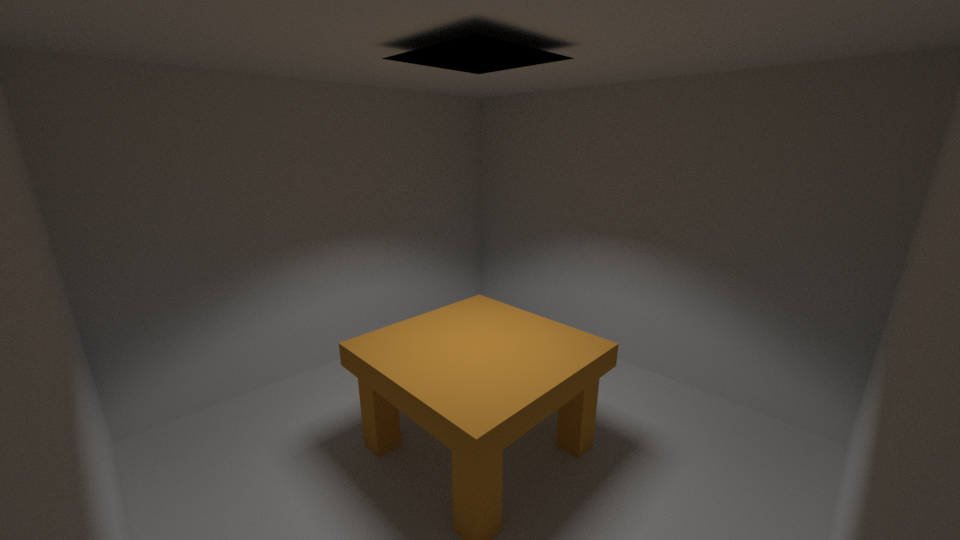
For this tutorial we will take a simple scene built for future use that includes something like a directional light, and make it easier to work with.

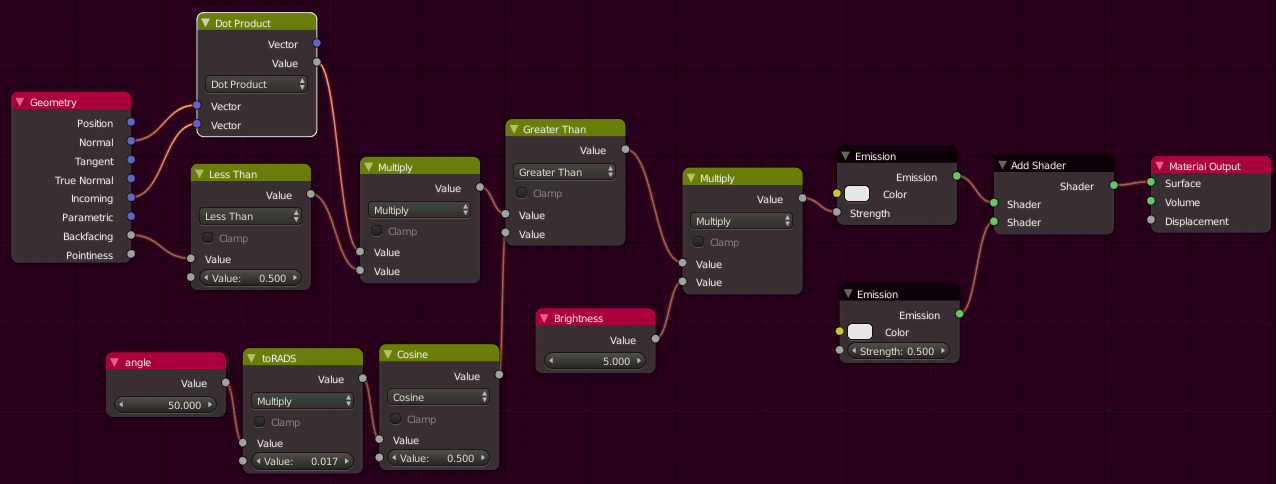
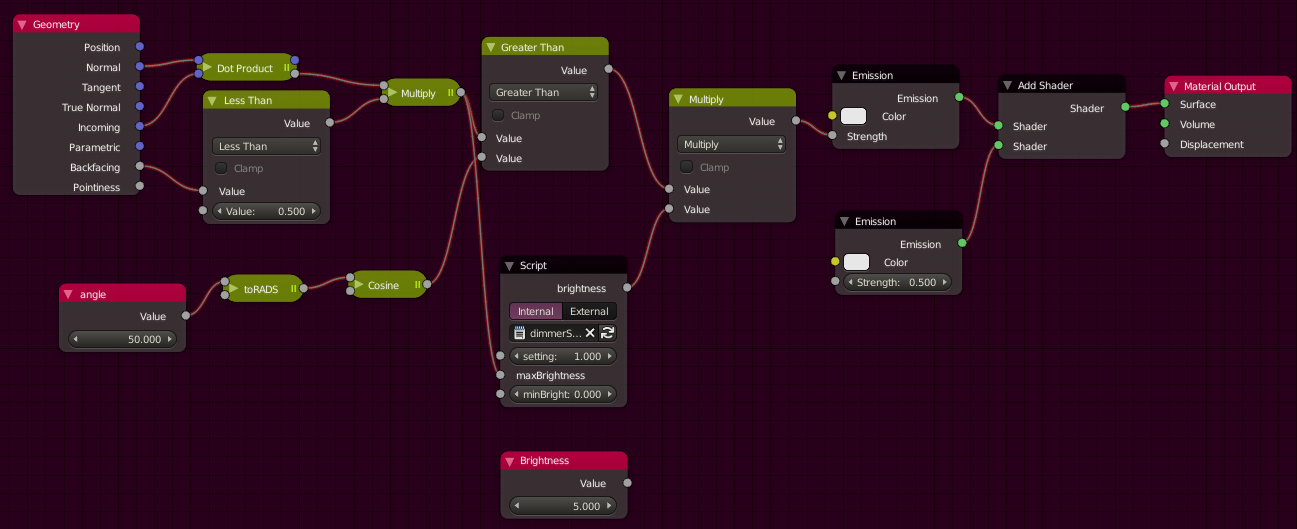
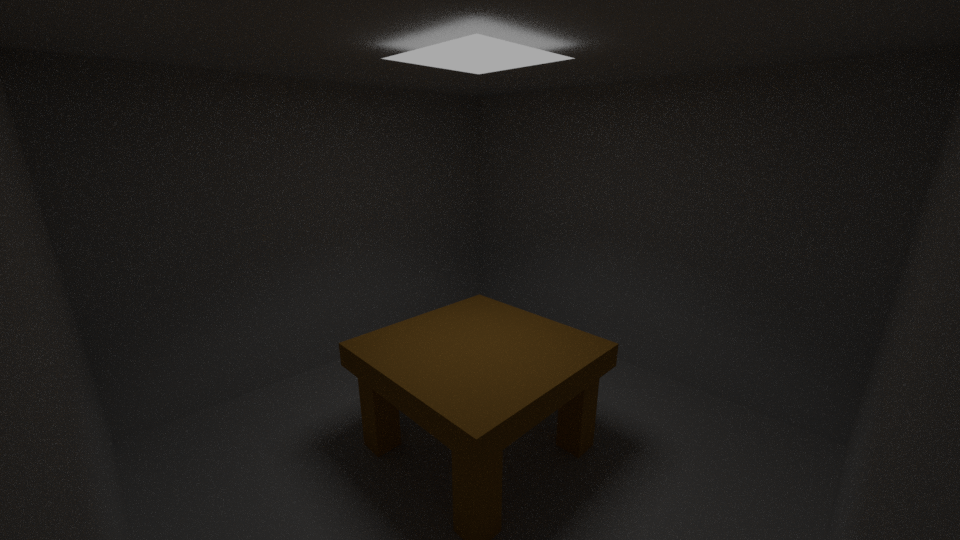
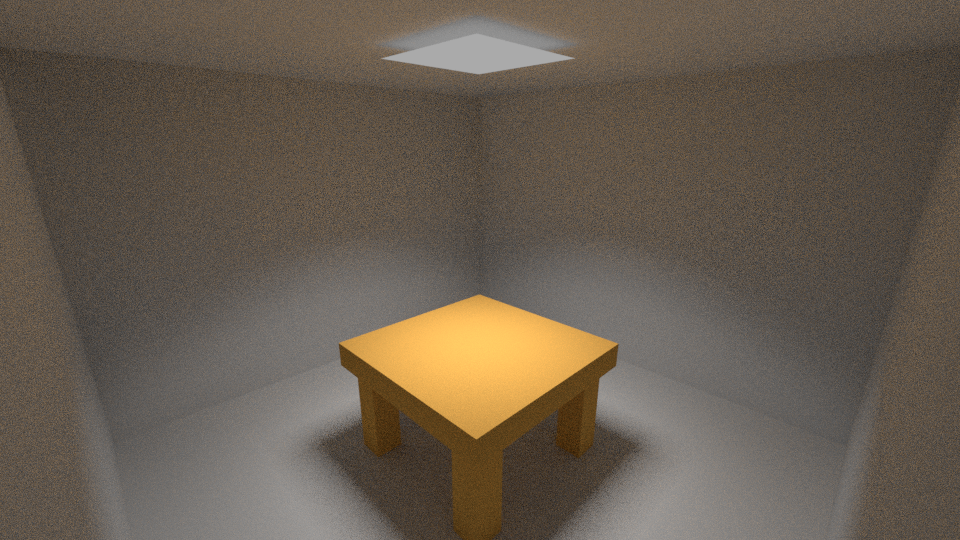
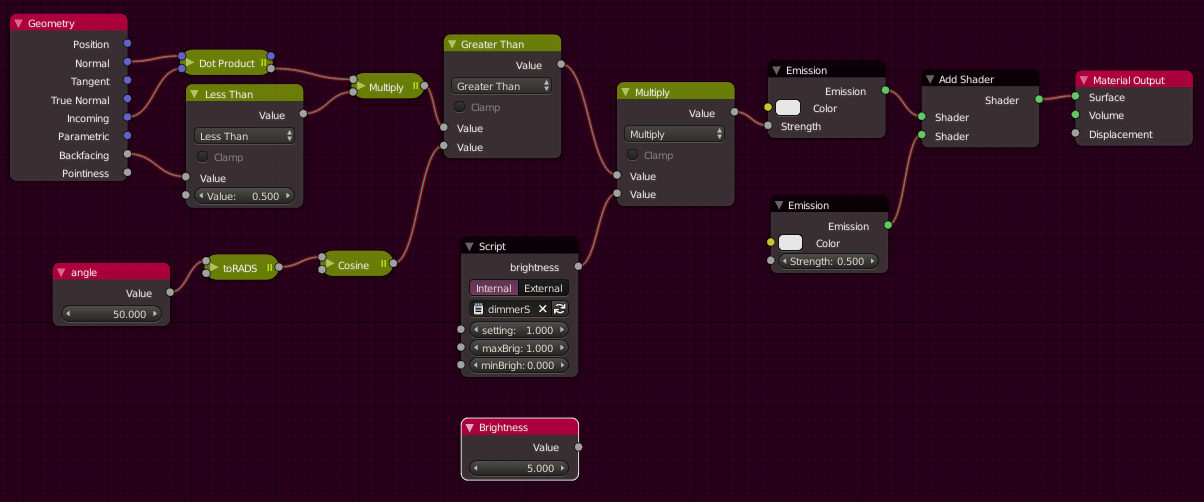
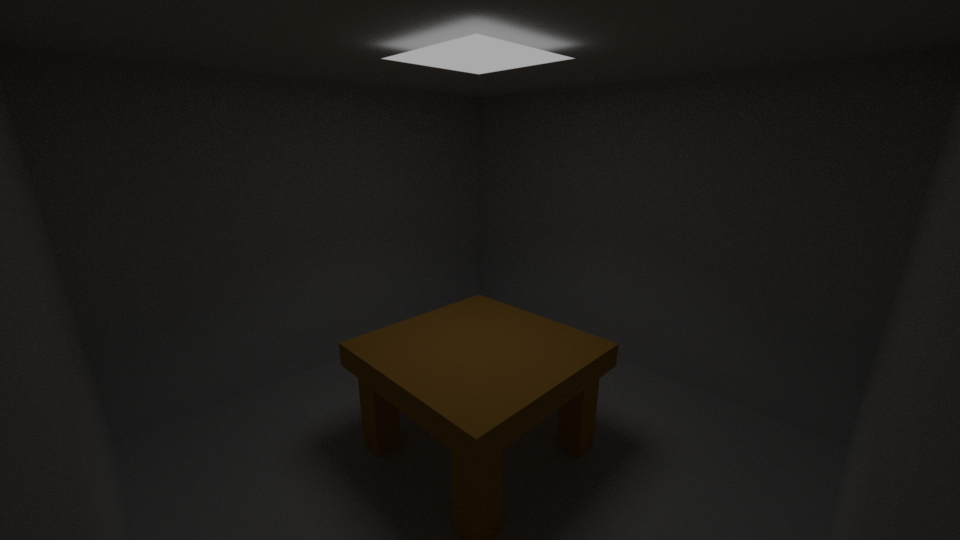
This is our scene; it’s been kept to about the bare minimum, but at least has a table to make things look less boring. The top is the light. The node setup for the light’s material looks like this:

Not extremely complex, but for simply creating a light with a little directionality, using an angle to define that directinality, adding some scattering within the light so it doesn’t look like a black box, this seems a bit much. This and future additions could be made more organized with groups, but groups still don’t solve the issue of formulas being easy to put in, and this is a tutorial for OSL. this setup also doesn’t do a very good job if we want to have something like a dimmer switch to control the brightness of the light. That will be the issue we will solve with OSL.
#####(As you skipped the intro, you will need to know, the tutorial’s scene and the light material are the last 2 image above. Take a look at those. The light is what is being improved.)
You should download a copy of the OSL language specification. It will be referenced several times, and it is a well written document you will need while using OSL, and is on the OSL Github page. If using OSL with cycles, you should also have a look at the documentation related to OSL in blender, especially this page.(https://docs.blender.org/manual/en/latest/render/cycles/nodes/osl.html). This is because the implementation of OSL does not perfectly match what is described in the OSL language specification. (Yes, this is part of the tutorial, and you should do this. The OSL spec is not that scary of a document.)
Blend file: https://1drv.ms/u/s!AvSRWVgmeJoqbOa2yMxgCiioz4M
You will also need to download the blend file for this tutorial or make an equivalent scene. It is a very bare bones scene, and below is the material with all nodes expanded if you wish to duplicate it instead.
Preparing blender
This is what is required for setting up a blend file with OSL, along with pointing out some aspects about OSL. This is from a completely new file, and some tasks may have already been completed.
Let’s start by setting up blender to use OSL. First, blender will need to be using cycles or another render engine that can use OSL scripts. Blender internal does not work wits OSL. If you were planning on using OSL with Blender Internal, I’m sorry but this will probably not work.
Next OSL must be enabled in the render panel of the render tab (Properties area> render tab > render panel > Open Shading Language checkbox). It is not by default ( at least in 2.76 and 2.77 which I currently use) so this is something you will need to remember how to do before scripting. If you do not, you will find nothing will work, and for no obvious reason.
To aid in troubleshooting we must also open up the console. This is easy, just hit “Toggle System Console” under “Window” in the Info area (Info area> Window > Toggle System Console).
Lastly blender cannot do GPU rendering with OSL enabled using cycles. There is no setting to change here; just something to take note of.
So to recap:
- Cycles (if not already selected)
- Enable OSL
- Open the Console (This can wait till you’re actually troubleshooting)
The Plan
Now that everything is set up, we can begin scripting. OSL syntax is basically C/C++ syntax with some very small changes. If you already know C or C++ then this should be easy.
First, if we want a dimmable light, we might not want to have to remember what the maximum value is. I also seem to remember that while growing up, the dimmer switches in my grandparent’s basement my not have gone all the way down, so we may want a minimum brightness as well. Also, A quick google search reveals that some might. Lets add these functionalities as well, since we might want to reuse this later. This will be as simple as the formula below.
brightness = setting * (maxBrightness – minBrightness) + minBrightness
maxBrightness: The maximum light level desired.
minBrightness: The minimum light level desired.
setting: The mount between the minimum and maximum brightness values that will be output.
From that simple formula, I’m counting at least 3 math nodes (1 multiply, 1 add, and 1 subtract). This will, however, be very simple in OSL.
Making a Script File and some OSL Syntax
Making a Script File and some OSL Syntax
Once we’re done here, we’ll wind up with what basically a node that will look like this:

This node will contain our formula, and will replace the value node I labeled “Brightness”.
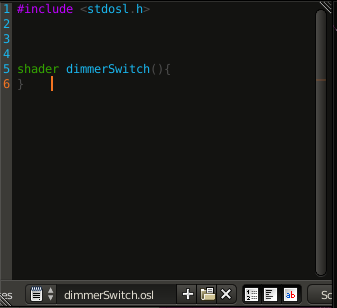
To set up a script, go to the text area, and create a new text document labeled “dimmerSwitch.osl”.

All OSL scripts must have the “.osl” file extension for blender to recognize it as an OSL script.
Next add the line “#include <stdosl.h>” to your script.
This is required on all scripts, and now you are ready to start writing scripts. To get OSL to provide line number, and text wrapping, and syntax highlighting, hit the 3 buttons beside the document name. (This is optional but helps, and I would advise you to use these tools.)
Now, for the most basic script that matches the node shown earlier, the following lines will need to be added. I will explain what these do next. Add each part as it’s explained.
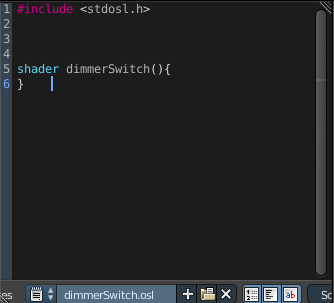
The first, thing blender needs to know about this script is to is what part of the script is going to become a node and what is just code that will be used somewhere else. That is what the part shown below on lines 5 and 6 do.

Those who already know C/C++ will recognize this as a function definition, and while knowing this is not important at this stage, a function is very much what this is. The statement “shader”, highlighted in a different color than the rest of the text, is much of what does. (As a side note, the word “shader” here, is specifying that we are creating a generic shader. There are other types, but for this tutorial, the generic shader will be all that is necessary.)
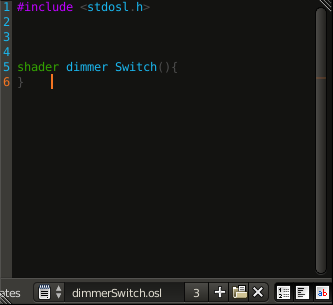
After “shader” is the name of our shader, and in this case we gave it the name “dimmerSwitch”. We can name our shader anything we want, but we can’t have any spaces in the name. Something like “dimmer Switch” does not follow syntax rules. We could use an underscore (“_”) in place of the space and have the name “dimmer_Switch”, if we wanted.
Two details do need to be addressed here. The first is while this is technically the name of the shader, the name that will be used in the node editor will be the name of the text document. The document name and the shader name are the same here, as this is good practice. The second is there can only be one shader per text document in OSL. If you need to create a different shader, then a second text document is necessary. This does not mean that one script cannot be used multiple time in one blend file.
Next are the open and clothes parentheses “()” and open and close brackets”{}”. These will specify what our inputs and outputs are, and what code is part of the shader, respectively. This will be covered in more detail later.
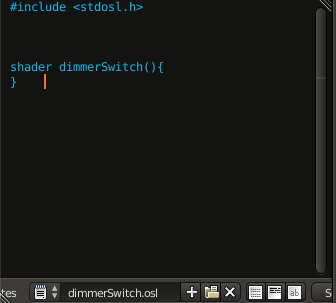
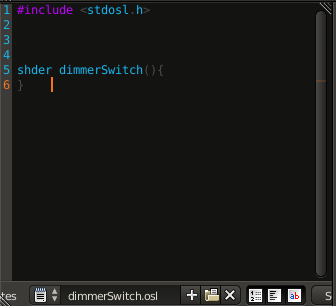
Now, if you have typed the same up to this point and your text is colored differently, it may simply be because you have syntax highlighting turned off or are using a different theme than I am using. If you have syntax highlighting turned on and you have “shader” spelled correctly, it will show up as a separate color from most other text. This is called syntax highlighting. Here is an example with syntax higlighting turned off.
The colors of the text and the colors used by syntax highlighting, will vary depending on the theme you use. I use abuntu ambiance as it is dark and tends towards more red tones, which helps while using blender late at night, so mine turns out to be green. Other themes will be different. Here is the same image displayed with the science lab theme.
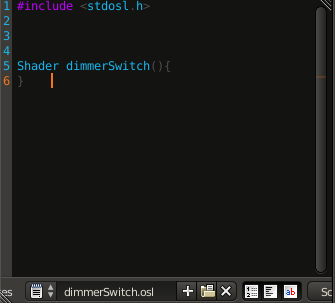
Regardless of what theme you use, you should note that, when spelled correctly, the word “shader” does show up in some different color, and that color means that blender has recognized it is a special word of some kind. If I had somehow mistype the word shader, then it would not show up in a special color. An example a typo causing the color of the text to change is given below.
A mistake like this is difficult for a human to spot, but a computer picks up these mistakes very easily, so tools like syntax highlighting exist to help people correct mistakes like this. I can’t predict what theme you are using, but with syntax highlighting on, the text area should display this word in a different color. If it does not, you should take note of that while debugging your code.
Getting back to the main point of the tutorial, OSL, like C and C++ are case sensitive. If I accidentally violate that case sensitivity, such as below, the script will fail to compile.
You can see this for yourself by attempting to use your script. To do so, first go to the node editor. Next, add create a script node (Add > Script > Script) .The script will look similar to the one below
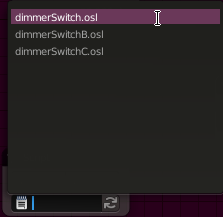
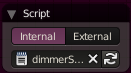
Clicking the empty field (first image shown below) will give you a list (second image shown below). From that list select “dimmerSwitch.osl”. (You should not have the other 2 scripts shown in the second image. They are present just to make the point that you might have other scripts, and you should be careful to select the correct one.)
Your node should now look like the one below.
The node can now be compiled by hitting the button with 2 arrows (shown below).

Once your script is done compiling, you should get some sort of message in the Info area. If your script fails, for instance because the “s” in “shader” is capitalized, then you will get an error like below.

If your script succeeds, the Info area should display a message like below.

At the bottom of this tutorial is a section dedicated to troubleshooting. It starts off with simple examples of how to go about troubleshooting. At this point, or at any point, if your script fails to compile, or does not do what you are expecting, then I would suggest heading down there. In using OSL, I have found troubleshooting to be something that needs attention brought to it, more than I can give in the middle of this tutorial without totally derailing it. It is for this reason I have moved the troubleshooting section to the bottom of this tutorial.
Adding Inputs and Outputs
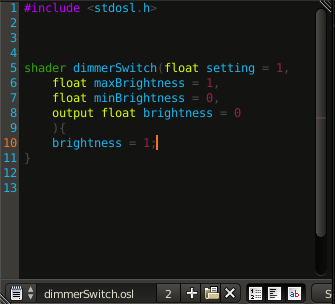
Now while this script may compile, It does not have any inputs or outputs. This is what we will add next. They will be placed between the parentheses of our script. Inputs and outputs are separated by commas (“,”) and can be on the same line or different lines. They all need to have a type, and initial value. Lastly any outputs need to be indicated as outputs. For inputs we will have the names “setting”, “maxBrightness”, and “minBrightness”. The output of our script will be called “brighness”. First we will add just the names. At this point our script looks like this.

For the types, they are added before the names, and separated by a space, similar to the name of the shader and the word ( /shader type), “shader”. As all of our types are simple numbers and we want to accept decimal values as well as while numbers, we will use the floating point type, indicated with the word “float”. After adding this, our script is as follows.

Note that “float” is also a special word, and as such is highlighted. Next we need the default initializers. This is what the input and output values will be if no other value is present. For inputs, this means what the value will be if no other node is connected, or value otherwise given. (I am not exactly sure what it means for outputs, but this is required to compile the script.) There is actually quite a lot that can be done here, but for now, we will just use a simple value for each. The syntax for the default initializers is and equals sign (“=”) followed by the value, or in more complex cases the expression that results in the default value. What an expression is will be elaborated when we add the formula to this script, but for now just think of it as a chunk of code.
Now the values themselves need to be chosen. For the inputs, values that would make sense for them will be used. For the maximum and minimum brightness values, the max should be above the min and 1 and 0 are simple values so those will be used to keep things simple. For the current brightness setting 1 will be used so that the lights are on by default as it makes more since that if a light is present, it probably needs to be on or risk having no light. This isn’t that important, and is just an attempt to make the script quicker to use. The output’s default will be 0, a value will always be given in the script and any case where the default is used needs to stand out by not following the normal behavior of the script, to make this happening easy to troubleshoot. After adding our defaults, the script now looks as shown below.

Lastly, the output needs to be defined as an output. This is done by placing the word “output” immediately before the type, but keeping the type and this word separated by a space.

Note that output is also a special word, and is also highlighted as such.
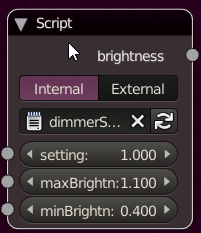
Now we have our inputs and outputs. To check that this was done correctly, the script can be compiled with the compile button on the node like before, or as the script already has previously compiled node, the “Script Node Update” button found along the bottom of the text area (shown below) can also be used. The difference between this button, and the other button is that this button updates all instances of this script with the changes made, and the other will only update the node it is on.

If there were no issues with compiling your script node, the node should now look like its intended end result (shown below for reference).
While the node may look complete, the body (or code for the functionality of the node) still needs to be done.
The body of the script
The simplest functionality is to output a constant value. We do that first, use an input, and finally add the equation created earlier for our body.
To output a value, the value to output needs to be assigned to the output variable ( or variables) of the script. A variable is just a holder for a value. All the Inputs and Outputs we already created are variables. Our output variable, is of course, ‘brightness”, and assignment is basically the same thing we did when giving our inputs and outputs default values. We simply give the name of the variable (in this case “brightness”) followed by and equals sign (“=”) and then the value we went to output.
The only difference between before and now is, because we are using this in our body, the end of this statement needs to have a semicolon (“;”) to identify where this statement ends. This is because the body is basically a list of instructions that ARE ALWAYS DONE, ONE AFTER ANOTHER FROM TOP TO BOTTOM. I wrote that in all caps because it is very important. These steps do not run simultaneously or with little apparent order, as nodes do. This does not mean that this effects how it will run alongside other nodes. When in the NODE EDITOR the script acts like any other node, but the instructions INSIDE this script will run ONE AFTER ANOTHER FROM TOP TO BOTTOM. Any instruction in this script will run AFTER all instructions BEFORE it WITHIN THIS SCRIPT, and BEFORE all instructions AFTER it WITHIN THIS SCRIPT. Semicolons, are required to identify where one step ends, and another begins. Going to the next line is not the end of a step but each step may be called (confusingly) a line. They do very much mean the same thing (hints the phrase “line of code”) but where one step ends and another begins is usually indicated by a semicolon (“;”). The other is the comma (“,”) when declaring inputs and outputs, but you do not have to know this at this point.
To summarize, the functionality of a script is given as a series of steps that are performed ONE AFTER ANOTHER FROM TOP TO BOTTOM, and these steps are separated by semicolons. The body of our shader is where we put these steps, including where we say what value we output. Our output is a variable, which is just a holder of a value. We assign our output a value, using an equal sign, like we did for the default initializers eelier.
For our output, we will start by sending out a single value of 1. Following the syntax requirements stated above (hint: the simicolon), our script winds up as below.

We now have the most basic script as defined above, Now we can connect it to the rest of the node group, and see the results. First, recompile the script. (Which button you use is up to you, in this case, as there is only one node with this script.) Next, place it in place of the “brightness” value node as seen below.

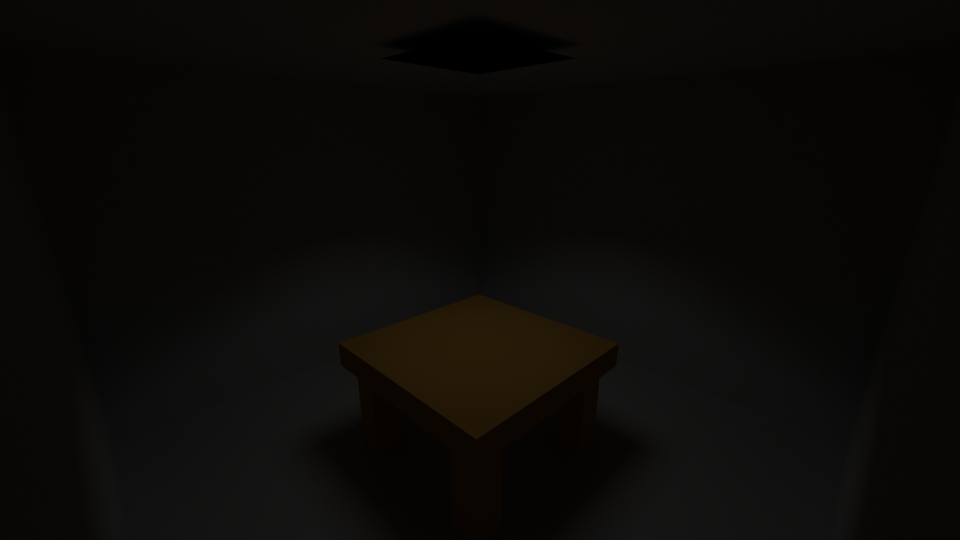
Below is the rendered result of adding our script into our material. It’s not very bright, but we are only giving the emission shader a value of 1.

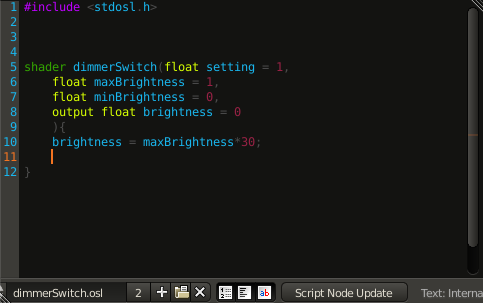
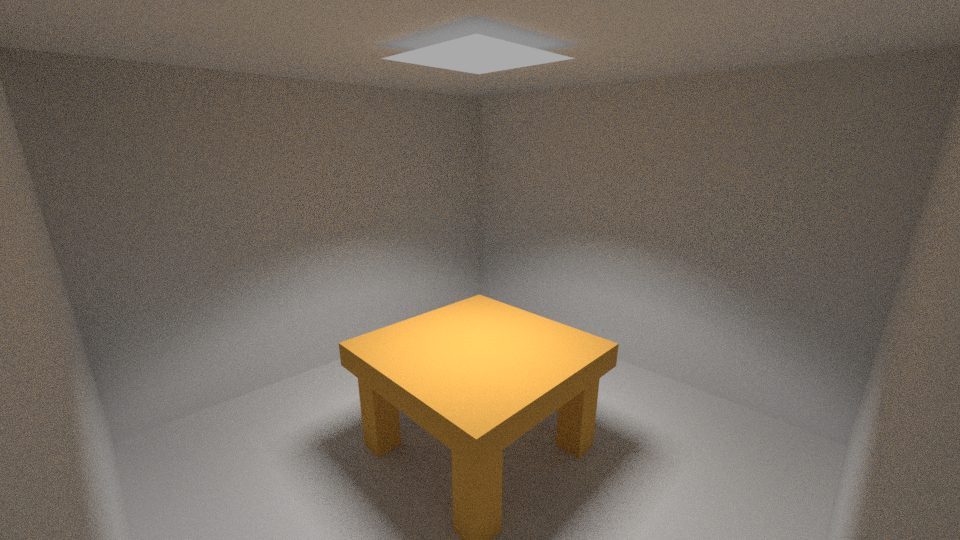
How about we change this so we output a value of 10 instead? (The script followed by the rendered result are below.)

This is much brighter, but all this is up to this point is a glorified value node. (You may have noticed the result in this example is slightly fuzzier. I simply reduced the sample count to reduce my render times while making this tutorial. This has nothing to do with changes made to the script. I am simply tired of waiting for the scene to render.) To do anything more interesting than this, we will need to use inputs. To do this, we only need to place the name of the input we want where our value is. Then the value that is input for that (or the default value if none exists) is what will be assigned to our output.
For this demonstration, we will randomly use the maxBrightness input. The modifications to the script are shown below. (Don’t forget to compile the changes to the script as you follow along.)

Next, a default value of 1 is fine, but I think changing the value on the node to 50 will be much more interesting to see (shown below).

Now the rendered result is shown below.
With this much brighter lighting the table starts to look a little like cheese. Now that we can use an input, however, let’s try getting an input from something else, which is mostly what makes inputs useful. Let’s try making the change shown below.
the Result (shown below), isn’t vary interesting, mostly because the value coming in from there will be some value going from 0 to 1, which isn’t very bright to begin with, and there are a few other things drowning out the effect taking an input from that node has on our light, but If we could see the effect we would find that the numbers work out in such a way that the brightest light ends up aimed straight down from the light and will hit the center of the table. ( you’re welcome to look though the nodes to get a better understanding of what is happening here, but that’s not necessary. It’s just part of the calculation used for directing the light.)
Expressions
Now let’s use a little math, and try and try and enhance this effect.
To do this, we will need to use an expression, not just a single value. This is done much the same as you might in excel, just we will use the names of variables (such as our inputs) instead of the names of cells. For addition the addition sign (“+”) is used, for subtraction the dash is used (“-“), multiplication the star or asterisk (“*”) is used, and for division the forward slash (“/”) is used.
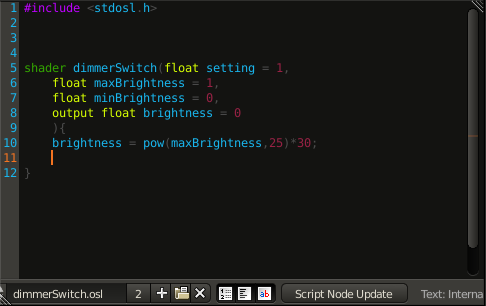
First let’s just scale this effect by 30. So for our script we make the following changes.
The rendered result (below) is clearly brighter, but no obvious directing of the light beyond what we had before.
Playing around with multiplying our input by its self several times in our script (such as below) might enhance the effect we get from this input.

This attempt gives a slight indication of the light being more directed, as can be seen below, but it is only noticeable with careful inspection. The corners of the table are slightly darker than they would otherwise be.
The last attempt had some effect, its just not enough. What it looks enhancing the directionality from this node will require is multiplying maxBrightness by its self far more than we would want to type. There is a name for this, however, and it is called an exponent. There is no exponent symbol ( called an operator), but according to the OSL language Specification, we do have a function for exponents. A function is just a little piece of code that can be reused in your code, just like the ones in Excel ( or C/C++ for those who know those languages). This function, along with a lot of other useful information for expressions, can be found in the “Basic math functions” under the “Standard Library Functions” section of the OSL language specification. There is also an entire section on expressions (titled “Expressions”) under “Language Syntax” that also has useful information. The function for exponents, the “pow” function is quite clearly stated that the first argument ( value or expression you put between the parentheses) is taken to the power of the second argument, and the arguments are separated by commas, like in Excel ( or C/C++). So if we want to get the 25th power of our input, we don’t have to type “maxBrightness” 25 times, we just type “pow(maxBrightness,25)”
Knowing we have this function, let’s try using it in our script like below.
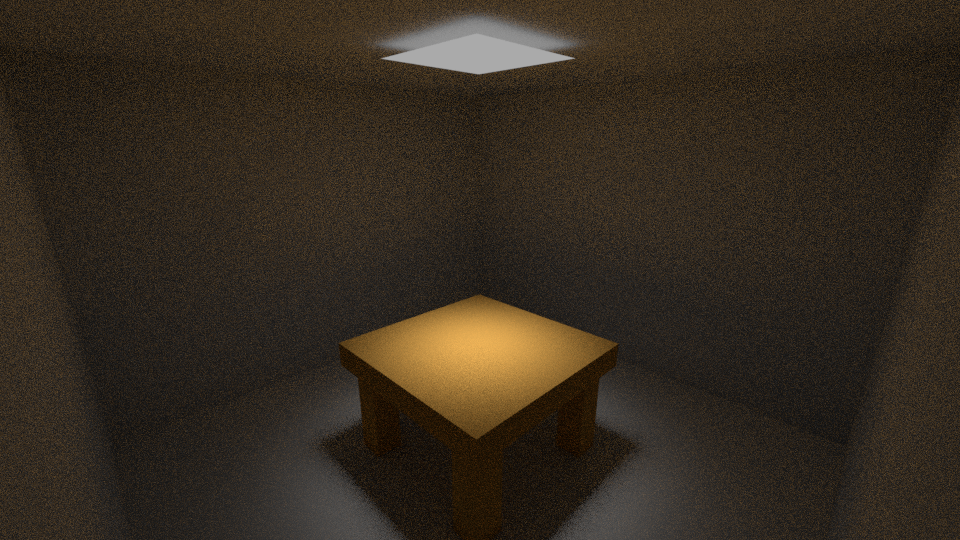
In the rendered result of the change to our script below, we can see the effect quite strongly. This enhancement is so strong, that much of the room is now brown from the light scattering off the table.
Now that we can use expressions, we can also add the formula from eelier. Just simply make the changes to your scrip shown below. ( Remember to compile after every change)
Documentation
At this point, we also need to document our script, so it can be used in the future. . This part of scripting is VERY IMPORTANT. All documenting our script means is we are adding some notes to the script, so that in the future, it is easy to understand how to use the script, and how the script works. (For a definition of easy, if you are needing one, it should be easier than reading the code its self, and easy enough that someone other than yourself could read only your documentation and understand how to use your code, and how it works if need be.)
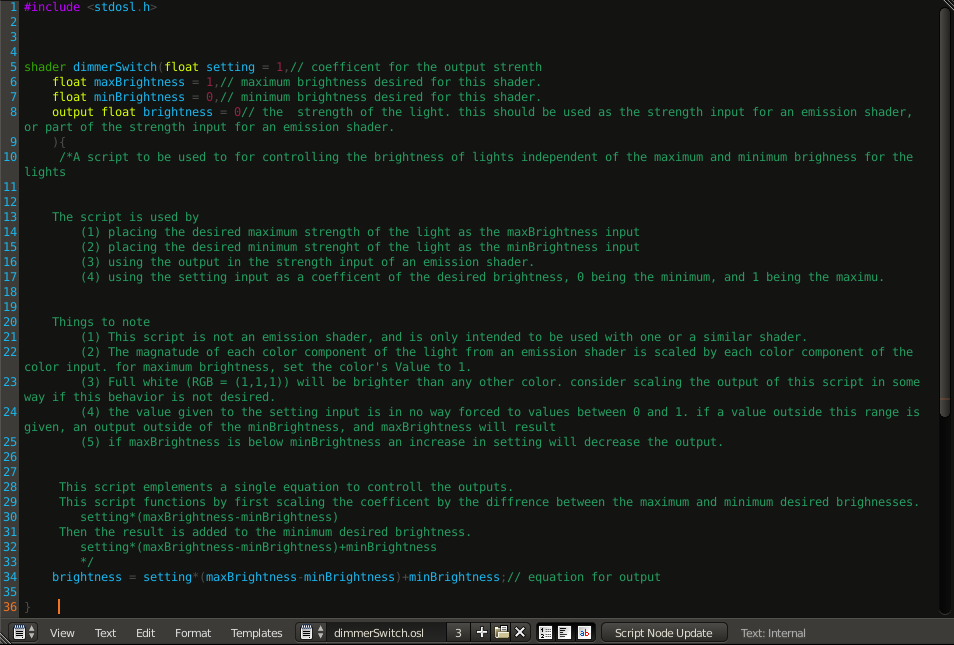
We are doing this now as we are no longer just using this script to explore the concepts of OSL’s syntax (the format of how the language is written), but actually making this into a script that will be used in the future. We have already done part of this, as the inputs and outputs are named in meaningful ways. What remains is simply explaining what they mean, what the script does, and how it does it. This will be done by adding comments. (For those who know C/C++, comments are done in the same way, as those languages, including C++’s inline comments) The most basic comment is the line comment. It is any text following 2 forward slashes (“//”) up to the end of that line. The other is the inline comment which is all text between after a “/*“mark and before a “*/” mark. Below is the script with added documentation.
Final Setup and Testing
Now, the changes can be made to the node setup to control the brightness of both the emission shaders like a dimmer switch. First, the script will need to be duplicated. Now that we have 2 script nodes, the Script Node Update button should be used, as both need to be updated. Do not attempt to avoid changes to a script by not compiling it. This is would be very poor practice. If you wish 2 script nodes to have different behaviors, you should use 2 scripts. Now that we have 2 scrip nodes, connect into the nodes as shown below.

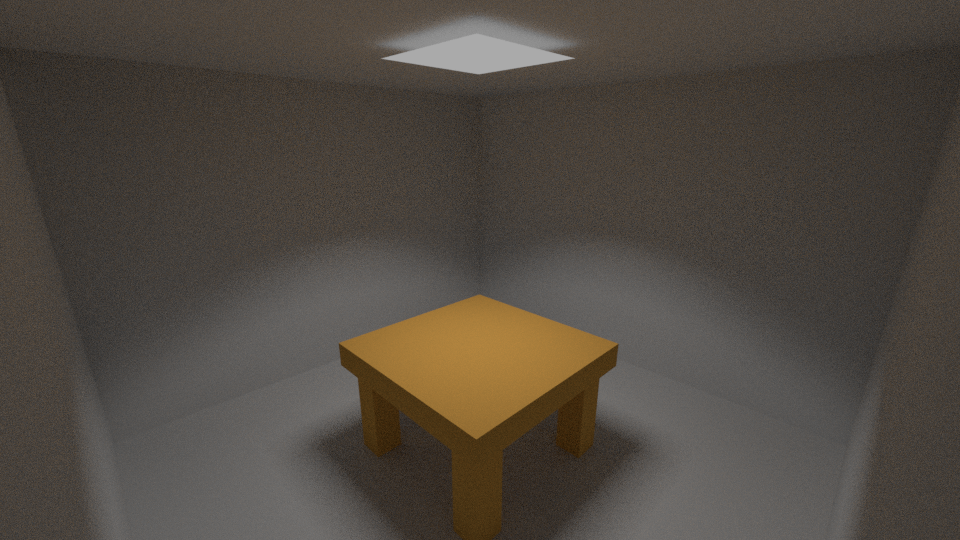
Now that the script is implemented, the script can be tested. The “Knob” value node will be the dial/knob of our dimmer switch setup. The rendered results at 10% brightness are shown below.

Next is 20% (below).

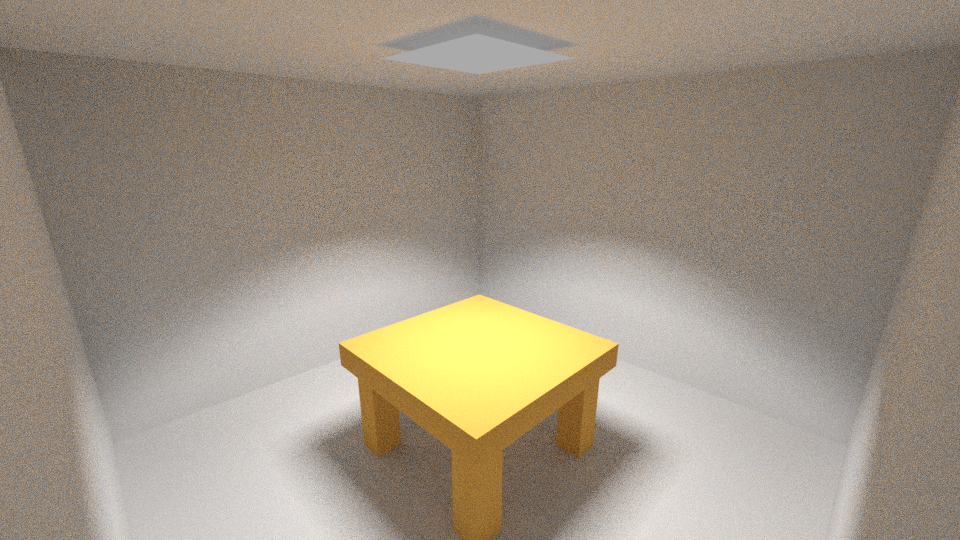
Lastly at 50% (below).

Troubleshooting section
Troubleshooting compile issues
Here again, are the messages for a successful and unsuccessful compilation.

If your script succeeds, the Info area should display a message like below.

The failure message, says to check the system console for errors. Note that this is not an area in blender but a separate window from blender, and should already be open if you followed the setup for blender that was given erlier in this tutoiral. If not, go back and folow the section on opening the system console. On windows the console will look like the system console.
The first example will be simply capitalizing the “s” in “shader” in the script shown below.
The error given for miscapitilizing “shader” is something like the message given below.
“tmpf908v7ri.osl:6: error: Unknown shader type: Shader”
These error messages are not always very helpful but they are also not the only tool available. If we look back at our script (below), we might just spot the issue without them.

As our example is simply a typo in the word “shader”, we can see that it is not highlighted in a special color but we know it should be. We can also note that the error message mentions the word “Shader”, and it is stated exactly as it is in our script. The line “6” is also near the line where our typo is, which adds some confidence to this being our issue. Line numbers in errors can be useful in debugging, but they do not always have the line needed, or even anything near it. The point I am trying to make here is that these error messages are not the be all end all of troubleshooting. In going though these messages start with the first error it gives you, as one error can cause another. With that error, start by looking for keywords in the message if it isn’t very clear what it means, and looking at the script around the line that the message indicated, or any lines related to those lines. You should look at the script carefully, taking note of the details of the script. You should use any and all tools available to you, such a syntax highlighting, word find (which is present in blender and can be utilized from countless other program by copying and pasting your script), ect. You might also play with what is allowed in the syntax to figure out what the problem is. You can actually move parts of instructions onto different lines sometimes, and that might help to give you an idea of what part of the line is causing the error. (This is especially helpful in fixing lines with long formulas.) Eventually, you may want to look up the error message in any documentation you can find that will describe the error, to see if that gives you any clarity. At some point in troubleshooting you may want to consider retyping your script. It is not fun, but can solve issues that have been plaguing your work for several hours.
Here is another example.
Here I have inserted a space into the name of the shader. The script does not compile, and the error message is as follows.
“tmp4q57ht5j.osl:6: error: Syntax error: syntax error”
The error seems to indicate some problem with the syntax, but fails to tell much more than that. It also gives us the line number 6. In troubleshooting this error, which I have found to be annoyingly vague in my own endeavors with OSL, is to focus on the syntax of any line around the line given in the message, and any line that might be related to those lines in some way. After looking at this script, it may be quite obvious that the name does not follow the syntactic rules of OSL, perhaps because of a typo. When typing, I personally have the reflex of hitting space at the end of a word when typing, so this is a very possible typo that may happen in someone’s work. This error is also the error that will come up if you miss a semicolon.
Troubleshooting functionality issues
This section is about finding out what is going on when the script compiles, but doesn’t do what you are expecting.
For our first example, we have our script (first image below), and we have set up it in our material (second image below).

The result is a little dark when we render our scene (shown below).

This makes sense, as we only gave the emission shader’s strength a value of 1. A brightness of 10 should be much better, so lets try that, BEING CERTAIN THAT WE COMPILE IT. Our modified script is below followed by the rendered result.

This result doesn’t make sense. Surely a brightness of 10, should be brighter than 5, the value that was present from the value node? Lets remove the portion of our light that simulates scattering within the light (as below, followed by the rendered result), so we only see the effect of the branch script we created is on.

Now that we can clearly see the light being caused by just the branch the script is on. If this brightness is supposedly 10, then what does 100 look like? Below is of course the result of changing our script for this test (first image), and rerendering our scene (second image). (On a side note, I’m using the render frame option, but troubleshooting like this can usually be done just as well with the preview available in blender called rendered display.)


Putting 100, as our scripts output value did nothing, what about 0? The changed script (first) and the rendered result (second), are shown below.

It’s as though our script has no effect on anything. If our script is multiplying everything else by 0, then this scene should be dark. The Next step is probably to directly connect the script to the value input on the emission shader. One setting this brings to mind, however, is the option to enable OSL. If we go and look at that setting, we see it is in fact disabled (shown below). If that is enabled, then we will proceed to further disassemble our material, and isolate our script.

If we enable it (first image), change our script back to output 1 (second image), and retender our scene (third image) and see what happens (all shown below). (Don’t forget to compile your changed script.)


That looks a little different, but let’s set the script’s output to 10 again, to make sure this made a difference. The results are shown below.


Clearly the Issue was because OSL was disabled. Now, we should make sure to remove any changes that we made while troubleshooting (putting the script back to what we need it to be and compiling it, and putting the nodes back the way they were).
When troubleshooting anything, the first thing to remember is to be systematic, such as was shown in the last example. This was an example of dealing with a problem with OSL being disabled by a setting, but this also shows some basic steps taken to isolate the undesired behavior in a material to a script that was not behaving as expected. This process can be taken further by creating an additional output within the script and using that output to test different aspects within the script. Other tools also exist for OSL, such as the printf function that is described in the String functions under the Standard Library Functions section of the OSL language specification, which can print any value to the system console. This function can be used to print the input and output values of a script onto the system console while the scene is rendering. Intermediate values can also be printed and used to probe parts of the script.

